
When working with stones for polishing or creating jewelry, it’s important to use the appropriate grit numbers based on the project. Each grit serves a specific purpose. If you’ve been confused about how sanding and polishing grit numbers work, this guide is here to explain why they matter and how to use them effectively in lapidary work.
What Is Grit?
Grit refers to the abrasive materials used in sanding and polishing to refine and shape the surface of a stone. These abrasive materials feature measurements that signify the size of the grit particles. Low numbers represent coarse grits, whereas high numbers represent fine grits. For example, an 80-grit sandpaper is coarse and meant for initial sanding, while a 3000-grit polishing compound is extremely fine and used for achieving a glossy finish.
Why Are Grit Numbers Important?
The grit numbers you choose directly determine how effectively you can refine the surface of your materials. Starting with an extremely fine grit can mean hours of work with little progress. Skipping to a high grit prematurely might leave your stones uneven or pitted. Using the correct sequence of grits ensures efficiency and a polished result.
Grit Sizes and Their Uses
1. Coarse Grit (60–220)
Coarse grits, ranging between 60 and 220, are ideal for heavy material removal. At this stage, you’ll grind down rough edges or shape the surface of your stone. For example, you can use coarse grit to smooth out a rock’s sharp edges during the initial step of tumbling or shaping, making it a crucial part of the process.
2. Medium Grit (220–400)
Prepare the surface for fine detailing by reducing visible tool marks and smoothing out uneven textures using medium grit. They are less coarse, making them perfect for refining the shape of a stone while removing deeper scratches left behind during the coarse grit stage.
3. Fine Grit (400–800)
Fine grit is where the smoothing process starts to deliver noticeable results for pre-polishing. It works effectively to reduce scratches while preparing the surface for the final polishing stage.
4. Ultra-Fine Grit (800 and Above)
Ultra-fine grits, ranging from 800 to 3000, are ideal for polishing and adding the final touch to your work. They create a glossy, reflective surface that makes pieces stand out. For example, these grits are ideal for achieving a glass-like finish on polished gemstones or jewelry pieces, bringing out their natural brilliance.
Understanding Grit Progression
Every project starts with coarse grit and works its way to finer grits, building on the previous step. Skipping a step can leave imperfections or flaws that a fine grit can’t fully fix, which is why professionals go through a specific sequence for the best results.
Begin with a rough grit, like 80 or 120 grit, to effectively shape and grind the surface. Once the basic shape is in place, move to a medium grit, like 220 or 400, to refine the surface.
From there, switch to a fine grit, such as 800 or 1200, to prepare the surface for polishing. Finally, finish with an ultra-fine grit or polishing compound of 3000 or higher to achieve a flawless, polished result.
Wet vs. Dry Sanding
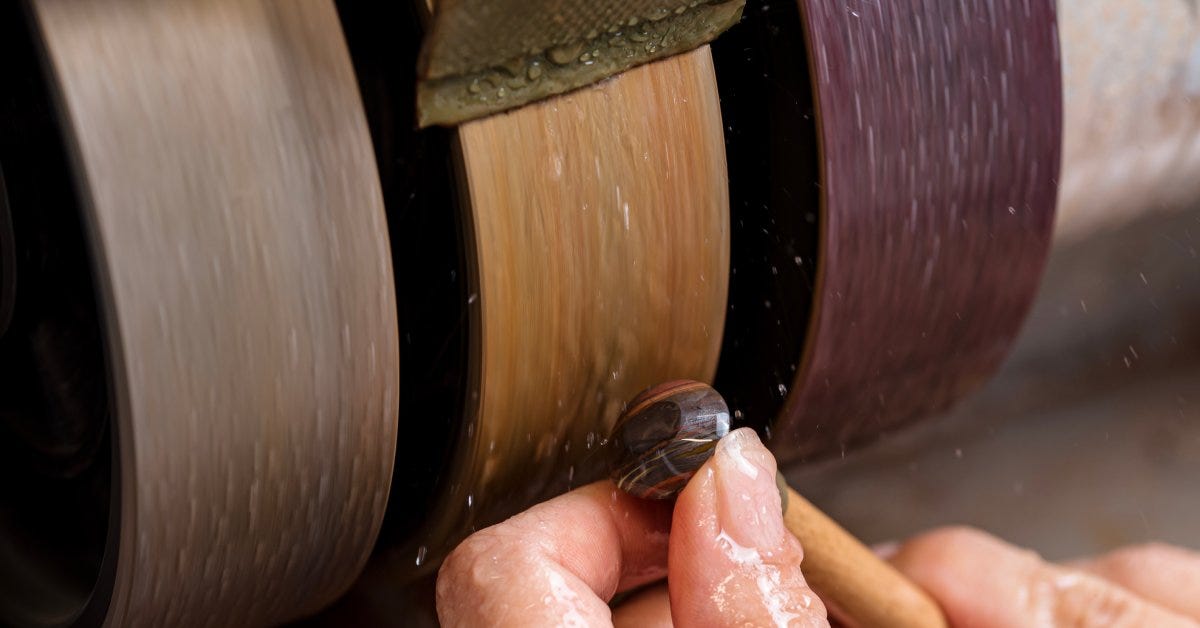
For better results, many lapidary artists prefer wet sanding over dry sanding, especially when working with stones. Wet sanding involves adding water to reduce heat and friction, prolonging the lifespan of your abrasive materials and preventing dust formation. This technique is particularly effective when using large rock tumblers equipped for polishing. It minimizes the risk of scratches on the stone’s surface and helps keep the tumbler’s motor from overheating.
Choose the Right Polishing Compounds
After sanding, polishing compounds bring materials to a high-shine finish. Each material reacts differently to specific compounds.
Diamond pastes work well with gemstones, delivering an ultra-smooth finish through their fine abrasive particles. Cerium oxide is ideal for glass-like stones such as quartz, while aluminum oxide complements soft stones like turquoise. By understanding all of the polishing options, you can confidently select the best compound to supplement your materials and achieve the desired results.
Common Mistakes To Avoid

Skipping grits is a common mistake that can lead to imperfections in your work, which are difficult to fix later. Always follow the proper grit progression to achieve flawless results. Another frequent error is not changing abrasives often enough. Worn-out sandpaper or polishing pads lose their effectiveness, so regularly swapping them out is important to incorporate into your process.
Lastly, using the wrong compound for the material can hinder your progress. Lapidary work isn’t one-size-fits-all, so it’s important to consider the specific properties of your stone and choose the right abrasive and compound for the job.
How Sanding and Polishing Grit Numbers Work With Tumblers
As we have covered, grit progression takes place in stages, much like with hand sanding. The typical process is as follows:
- 1. Coarse grinding (60–80 grit)
- 2. Medium grinding (120–220 grit)
- 3. Fine sanding (400–600 grit)
- 4. Polishing stage (ultra-fine grit or polishing compound)
Retailers like Kingsley North offer plenty of large rock tumblers for sale that include grit kits, so it’s simple to follow the correct stages. We provide models suitable for beginners and experienced hobbyists alike. You can also find polishing powder and abrasives that improve your projects.
The Patience of Polishing
Sanding and polishing stones go beyond achieving a glossy finish. It’s also about mastering patience and a fine balance of grit sizes. You might create a stunning piece of jewelry, craft a polished centerpiece, or simply learn the art of lapidary. No matter the case, properly working with grit numbers is one of the most vital steps in perfecting your craft.
Start Experimenting With Grit
Hopefully, this grit numbers guide for sanding and polishing has clarified how to incorporate abrasive materials effectively into your process. With the right grit progression and tools, you’re all set to transform rough stones into works of art.
If you’re ready to expand your toolkit or upgrade your setup, explore our equipment and supplies at Kingsley North. From polishing compounds to rock tumblers, we have everything you need to tackle your next masterpiece.